Salsa Cutthroat Flat Bar Conversion or..”How to turn your Drop-bar gravel bike into a 90’s mountain-bike”..
Why?
a) Why not
You may have seen Internet-Bicyclists claiming this is a terrible idea. The handling will be awful, drop bar bikes are too short for flat bars etc. Most internet-bicyclists are just parroting stuff they’ve heard other internet-bicyclists say and are incapable of thinking for themselves. Do what you want with your bike!
b) The main push to actually try this experiment is a nagging shoulder issue that has plagued me ever since getting the cutthroat over 18 months ago. I suspect this was due to an initially poor setup – trendy wide Walmer bars that either caused or exacerbated an existing imbalance. The component tweaking and bike fit came too late to fully resolve the issue, so I’m slowly working my way through months of physio to correct the imbalance. Riding the Cutthroat in normal drop bar guise does irritate things though, so rather than just riding my MTB on the groads all summer, I thought it would be worth experimenting with an imitation ‘mtb’ setup on the Cutthroat.
Parts required
Two things to consider when changing to a flat bar from the combined GRX Brifters; Shifters and Brake Levers.
I wanted to retain the existing drivetrain – a 2x GRX setup detailed here. This meant using flat bar shifters compatible with the GRX ‘road ratio’ derailleurs. Shimano makes the SL-RS700 for their 11-speed road drivetrains. There was no NZ stock so I ordered from a random store on Ali-express. They arrived after ~ 2 weeks and appear to be the real deal.
As the cutthroat has Flat mount brake calipers, I couldn’t just throw a pair of spare MTB brakes on there. Changing the levers is straightforward enough however. I already had an old XT lever and picked up another second hand. You’ll need a couple of new barbs and olives.
Process
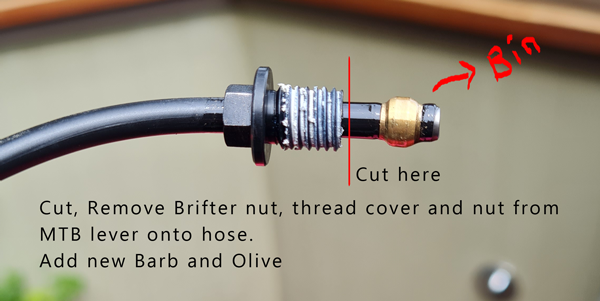
Flip back the hoods on the brifters, then peel off the bar tape that you spent hours perfecting. Locate the hydraulic hose nut and remove completely (10mm spanner for my GRX levers). It may be worth rotating the brifter a little so you don’t gouge the crap out of your bar.
Pull out the hose, and cut the last ~15mm off the end (proper tools are worthwhile). Slide off the GRX nut and replace it with the cover and nut from the MTB lever – in the correct order!
Insert a new barb – again, proper tools are very worth it. Slide on a fresh olive, shove hose into the MTB lever and tighten nut (8mm spanner this time). Repeat on the other side.
Undo the cable clamping bolts on the derailleurs and free the gear cables. Now you should be able to undo the stem faceplate and pull the whole bar assembly off – pulling the gear cables through their housings. Keeping the drop-bars and brifters assembled will make it easier to switch back without too much faff getting everything lined up again.
Install your new bar (and stem if you’re changing that) so you can mount the shifters and brake levers. Now you can do a quick bleed of the brake levers. Thread gear cables through their housings – you may need to swap out the housing ends at the shifter for MTB versions.
This should take 2 minutes… but took me about half an hour thanks to the 18 months of accumulated dirt in the front derailleur internal routing hole.
Compressed air and excavation with a seal pick slowly started to move a few particles but it was slow going. A broken spoke, bent slightly to match the curve of the routing, and some light tapping with a hammer eventually helped clear the blockage.
Finally, setup gears, then do some wheelies now you have a normal bar fitted.
Cost
The pair of shifters was ~ $230NZD from Ali-express which is about the same as the RRP in NZ. Brake levers are around $90NZD each new, but should be easy to find second hand. I’ve got plenty of bars and stems to choose from, but you may need something new to dial in the fit. Barbs and olives are a few dollars each.
Weightweenies
Is a Flat bar setup lighter than the Drop bar configuration?
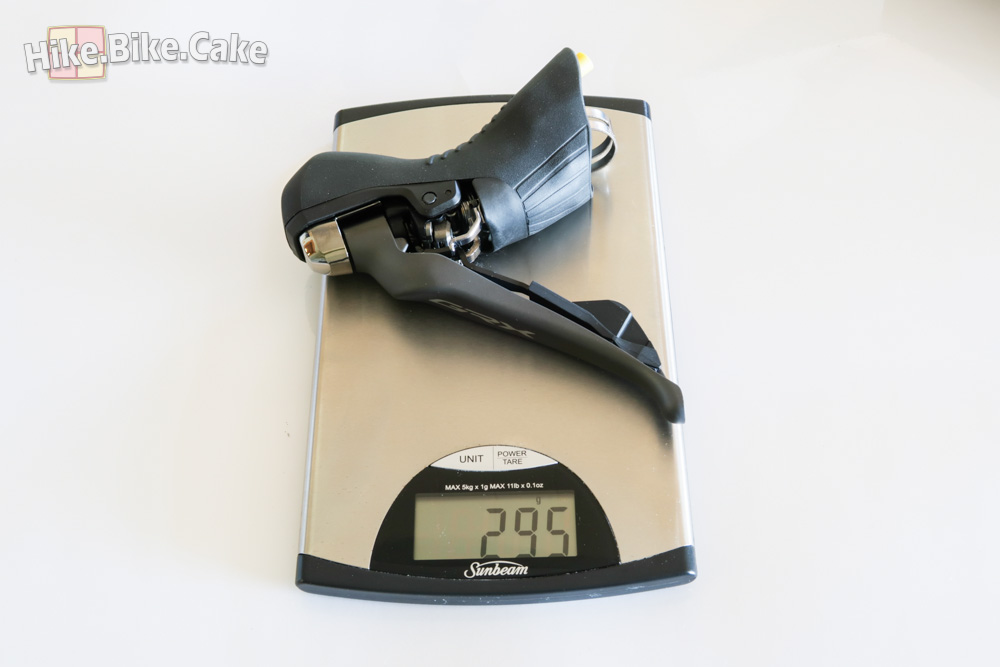
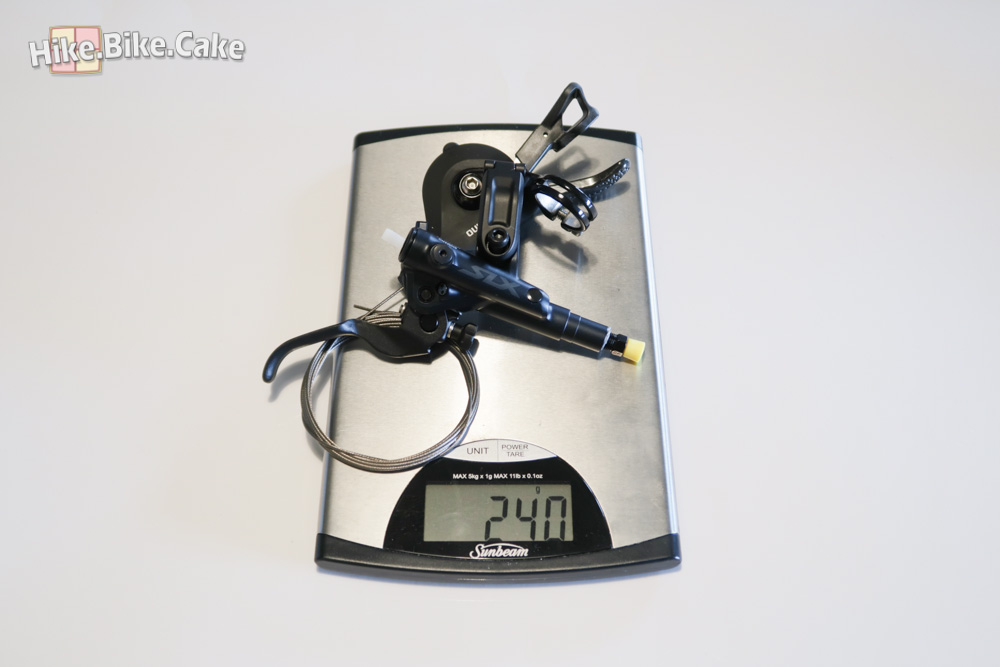
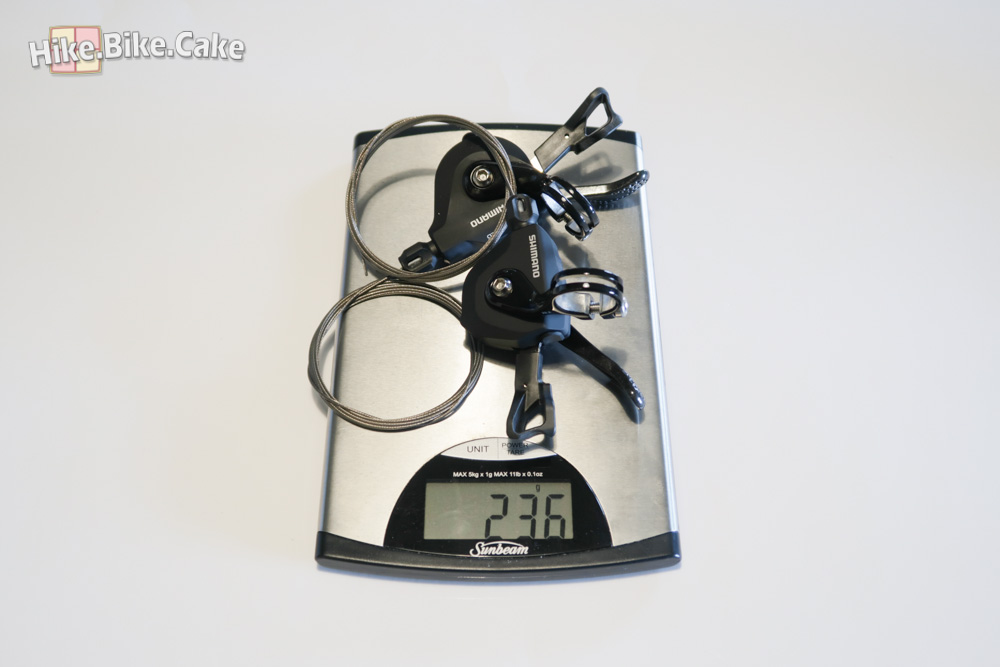
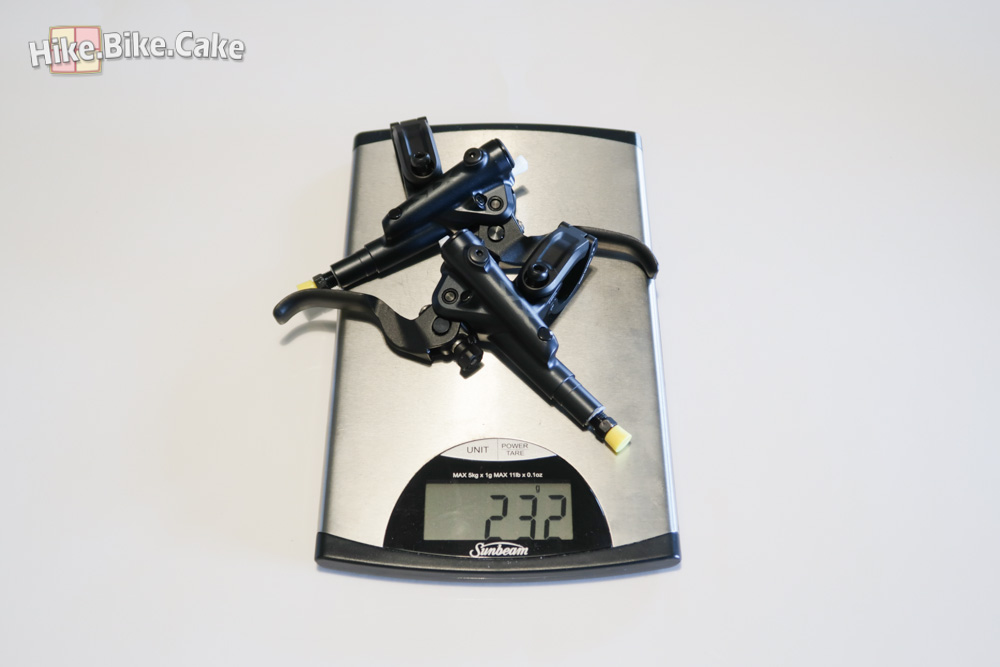
This will largely be driven by the Bar and Stem combinations for each. When considering just the GRX brifters vs. the MTB shifter/brake combo, the MTB setup comes out lighter by around 150g including cables.
| Item | Component | Mass (grams) |
|---|---|---|
| Left Shifter | Shimano SL-RS700-L | 113g |
| Right Shifter | Shimano SL-RS700-R | 123g |
| Left Brake Lever | Shimano XT BL-M8000 | 112g |
| Right Brake lever | Shimano XT BL-M785 | 117g |
| TOTAL MTB | 466g | |
| Left Brifter | Shimano GRX ST-RX810-L | 293g |
| Right Brifter | Shimano GRX ST-RX810-R | 295g |
| TOTAL GRX | 588g (+122g) |
Note – gear cables not included in brifter weight so it’s actually a few more grams lighter than this. SLX levers shown in photo’s – pretty much the same weight as XT.
The Ergon GA3 Large grips are 134g, which is pretty similar to the Supacaz bar tape and all the gel pads fitted to the drop bars.
The Cowchipper is a similar weight to a basic MTB bar at ~300g and any stem tweaks could change things by +/- 20g-ish. A fancy, light carbon bar would drop another 70g maybe.
Geometry / Fit vs. MTB
The primary consideration when putting a flat bar on a ‘drop-bar’ bike is the effect on the fit – particularly reach. Frames are shorter than typical MTB’s to accommodate the extra reach provided by the shifter hoods. Removing these for a flat bar setup therefore shortens everything up somewhat. This can be counteracted by using a longer stem with the flat bar, or Curve now make the Remlaw bar – designed specifically for this purpose; replace your drop bar while retaining the typical reach provided by the hoods.
This all assumes that your drop bar fit is correct in the first place and you want to retain it with the flat bar..
In my case, I wanted to replicate the fit of one of my other bikes that I find comfortable for multiple days riding with my pesky shoulder issue.
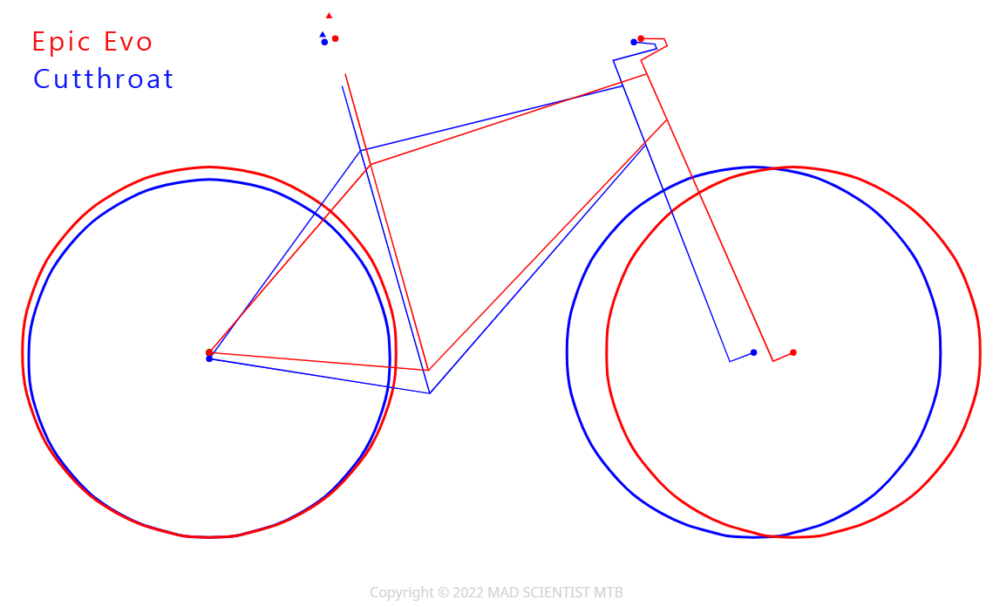
I’d recently put my Specialized Epic Evo into Bikepacking mode..simply switching out the bar for a Soma Dream Riser to add height and backsweep for long-distance comfort. After two separate 4 day trips, covering 5-600km each with a large % on road & gravel, this setup proved comfortable enough to imitate.
Instead of dicking around with a tape measure for many hours, I luckily found this excellent tool from the Madscientistmtb (https://madscientistmtb.com/bike-geometry-calculator/).
This allows me to enter all the dimensions for both bikes, and then tweak stem lengths and stack heights to arrive at the same positions for my hands, relative to the saddle and the BB etc.
Geometry details for your bike are easily found online – try geometrygeeks.bike to begin with.
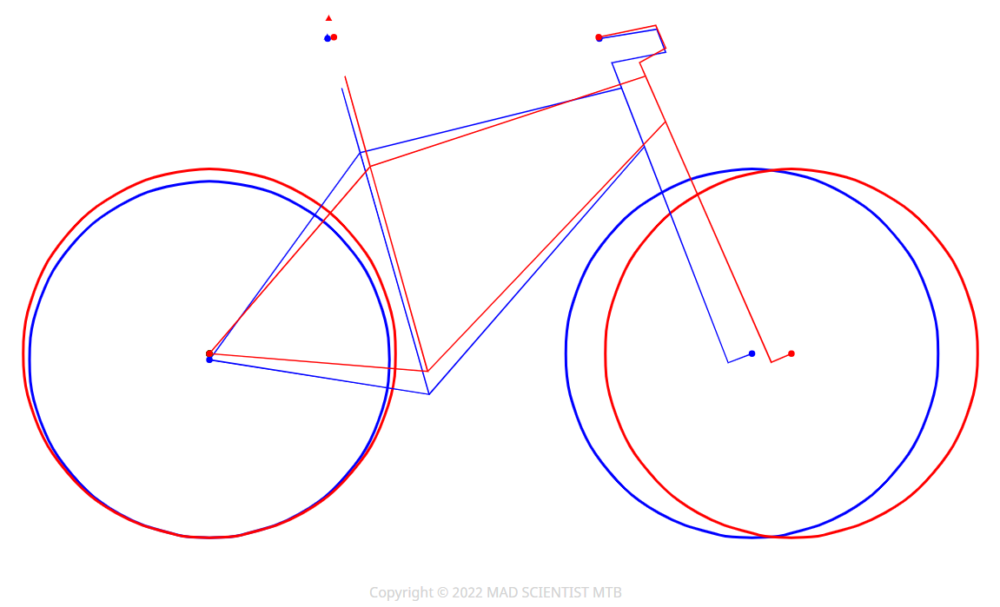
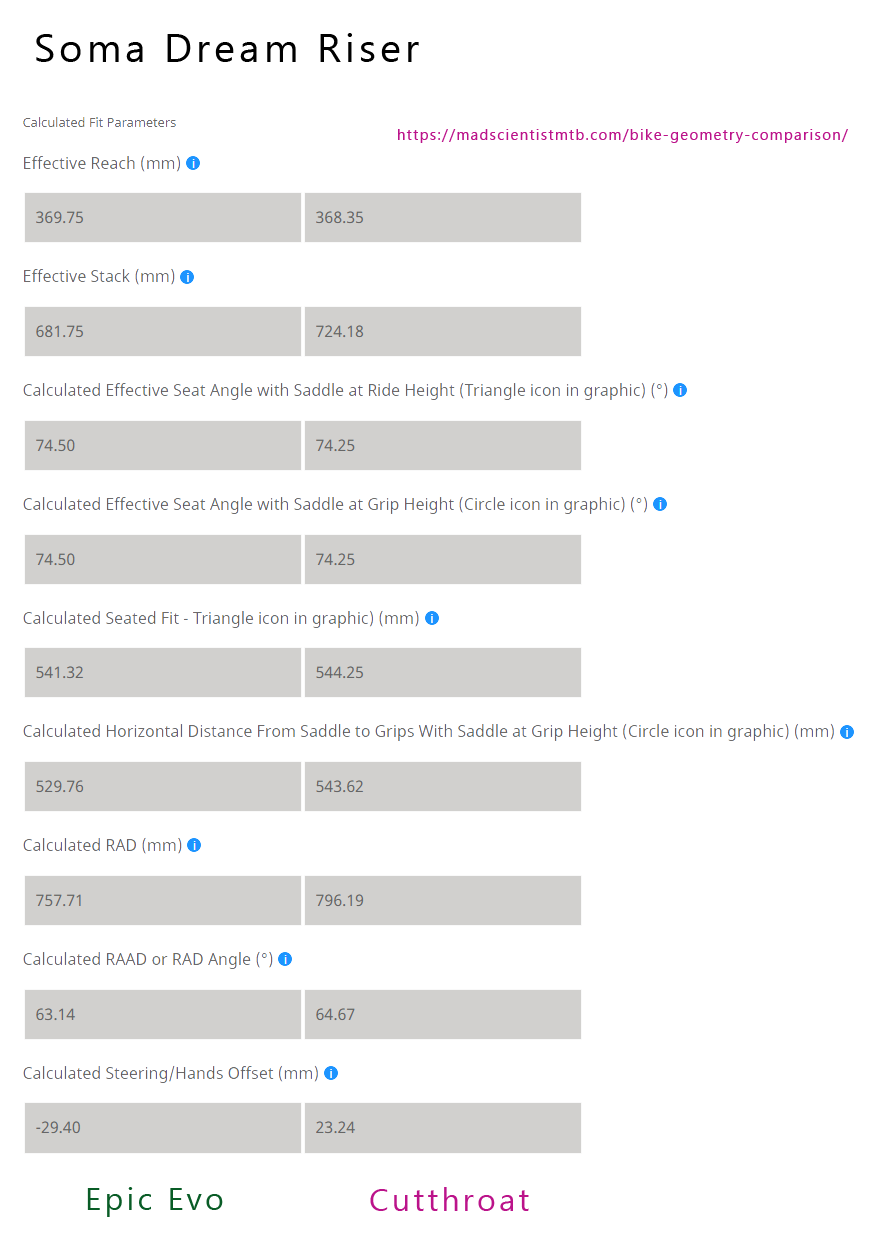
A 110mm / -10° stem got me to the same position as the Epic, and because of the massive backsweep of the Soma bars, the resulting SHO (Steering/Hands Offset) was 23mm so steering felt perfectly normal.
First Impressions
After around 100km of test rides, I decided this was definitely a long-distance comfort setup. For day to day hooning around gravel roads in the forest, it was way too short and upright.
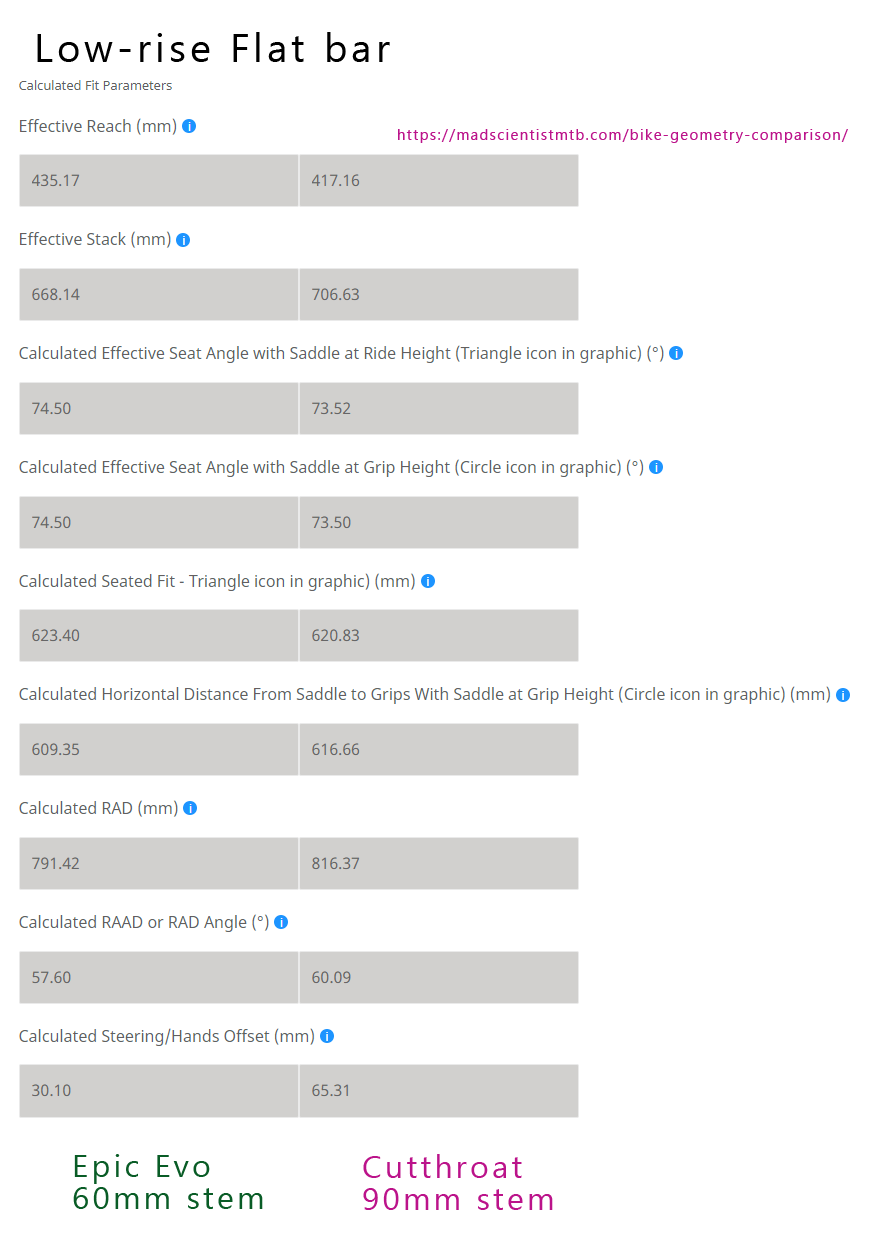
Back to the calculator and I could easily tweak the numbers to replicate a different setup. I’m on iteration #3 currently, a 90mm stem and regular low-rise flat bar that puts my Seated Fit and Reach numbers right between the comfort setup and full on XC-race mode.
Compared to riding a regular 29er hardtail, the only difference is the Steering/Hands Offset. As I’m not riding tight twisty singletrack, it’s not noticeable at all. For me, the benefits of the Cutthroat (high stack, massive frame triangle for all the snacks) outweigh any handling benefits of a regular modern hardtail for long-distance gravel & bikepacking.
For further reading it’s interesting to know about things like RAD (Rider Area Distance @ Leelikesbikes), although this is more applicable to Dynamic Bike fit – it depends what kind of things you’re riding.
Flat Bar vs. Drop Bar
Feels good man..
Time will tell if I miss the drops (e.g. when speeding down loose gravel roads) or the multiple hand positions drop bars offer. I’ll still be using Aero-bars for long distance adventures so that remains an alternative position to give the hands a rest. Braking and general handling feel more natural to me coming from over 25 years of mountain bikes.
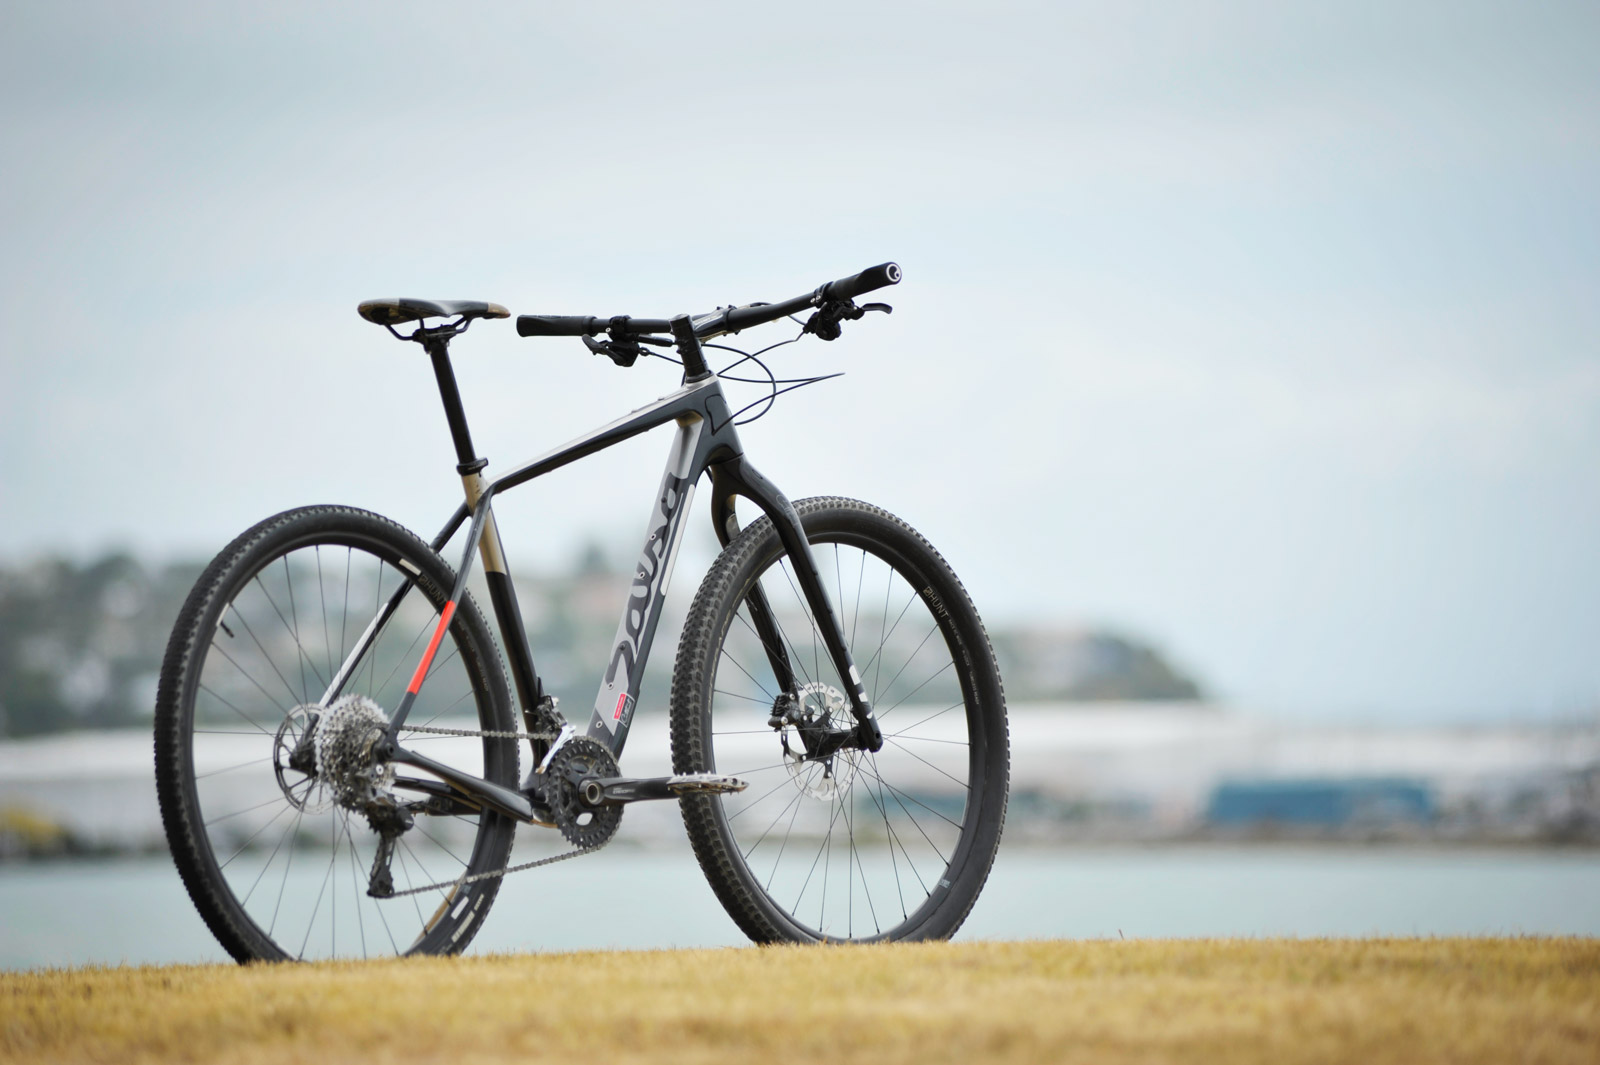
Here’s what it looks like >